Start without pitch correction mode
This alternate mode needs to be selected from within Vocal Tune Studio's Settings which can be found via the Three Dot Button ![]() options. It can be activated and deactivated freely but please be aware that activating it from the default Pitch and Time 'auto retune' mode will remove any changes you have made to the pitch placement of notes and changes to their retuning parameters and, likewise, deactivating it will return all notes to their reset, start position within the default mode. With this option selected, Vocal Tune Studio will always open in this mode until it is deselected.
options. It can be activated and deactivated freely but please be aware that activating it from the default Pitch and Time 'auto retune' mode will remove any changes you have made to the pitch placement of notes and changes to their retuning parameters and, likewise, deactivating it will return all notes to their reset, start position within the default mode. With this option selected, Vocal Tune Studio will always open in this mode until it is deselected.
Start without pitch correction mode gives you even more control over the subtle retuning of your vocal performances. It is also the approach used by several desktop vocal tuning applications, so it may suit your chosen workflow better if you are already familiar with such software. As the name suggests, it starts from a position where no retuning at all has been applied. As can be seen in the screenshot below, the yellow lines representing the retuned pitch initially sit exactly on top of the black lines representing the original pitch detected. The note events are placed around areas where the pitch is consistent enough to be considered a single note, but they do not sit exactly within the grid of the piano roll area, on specific quantized notes, because no correction has taken place.
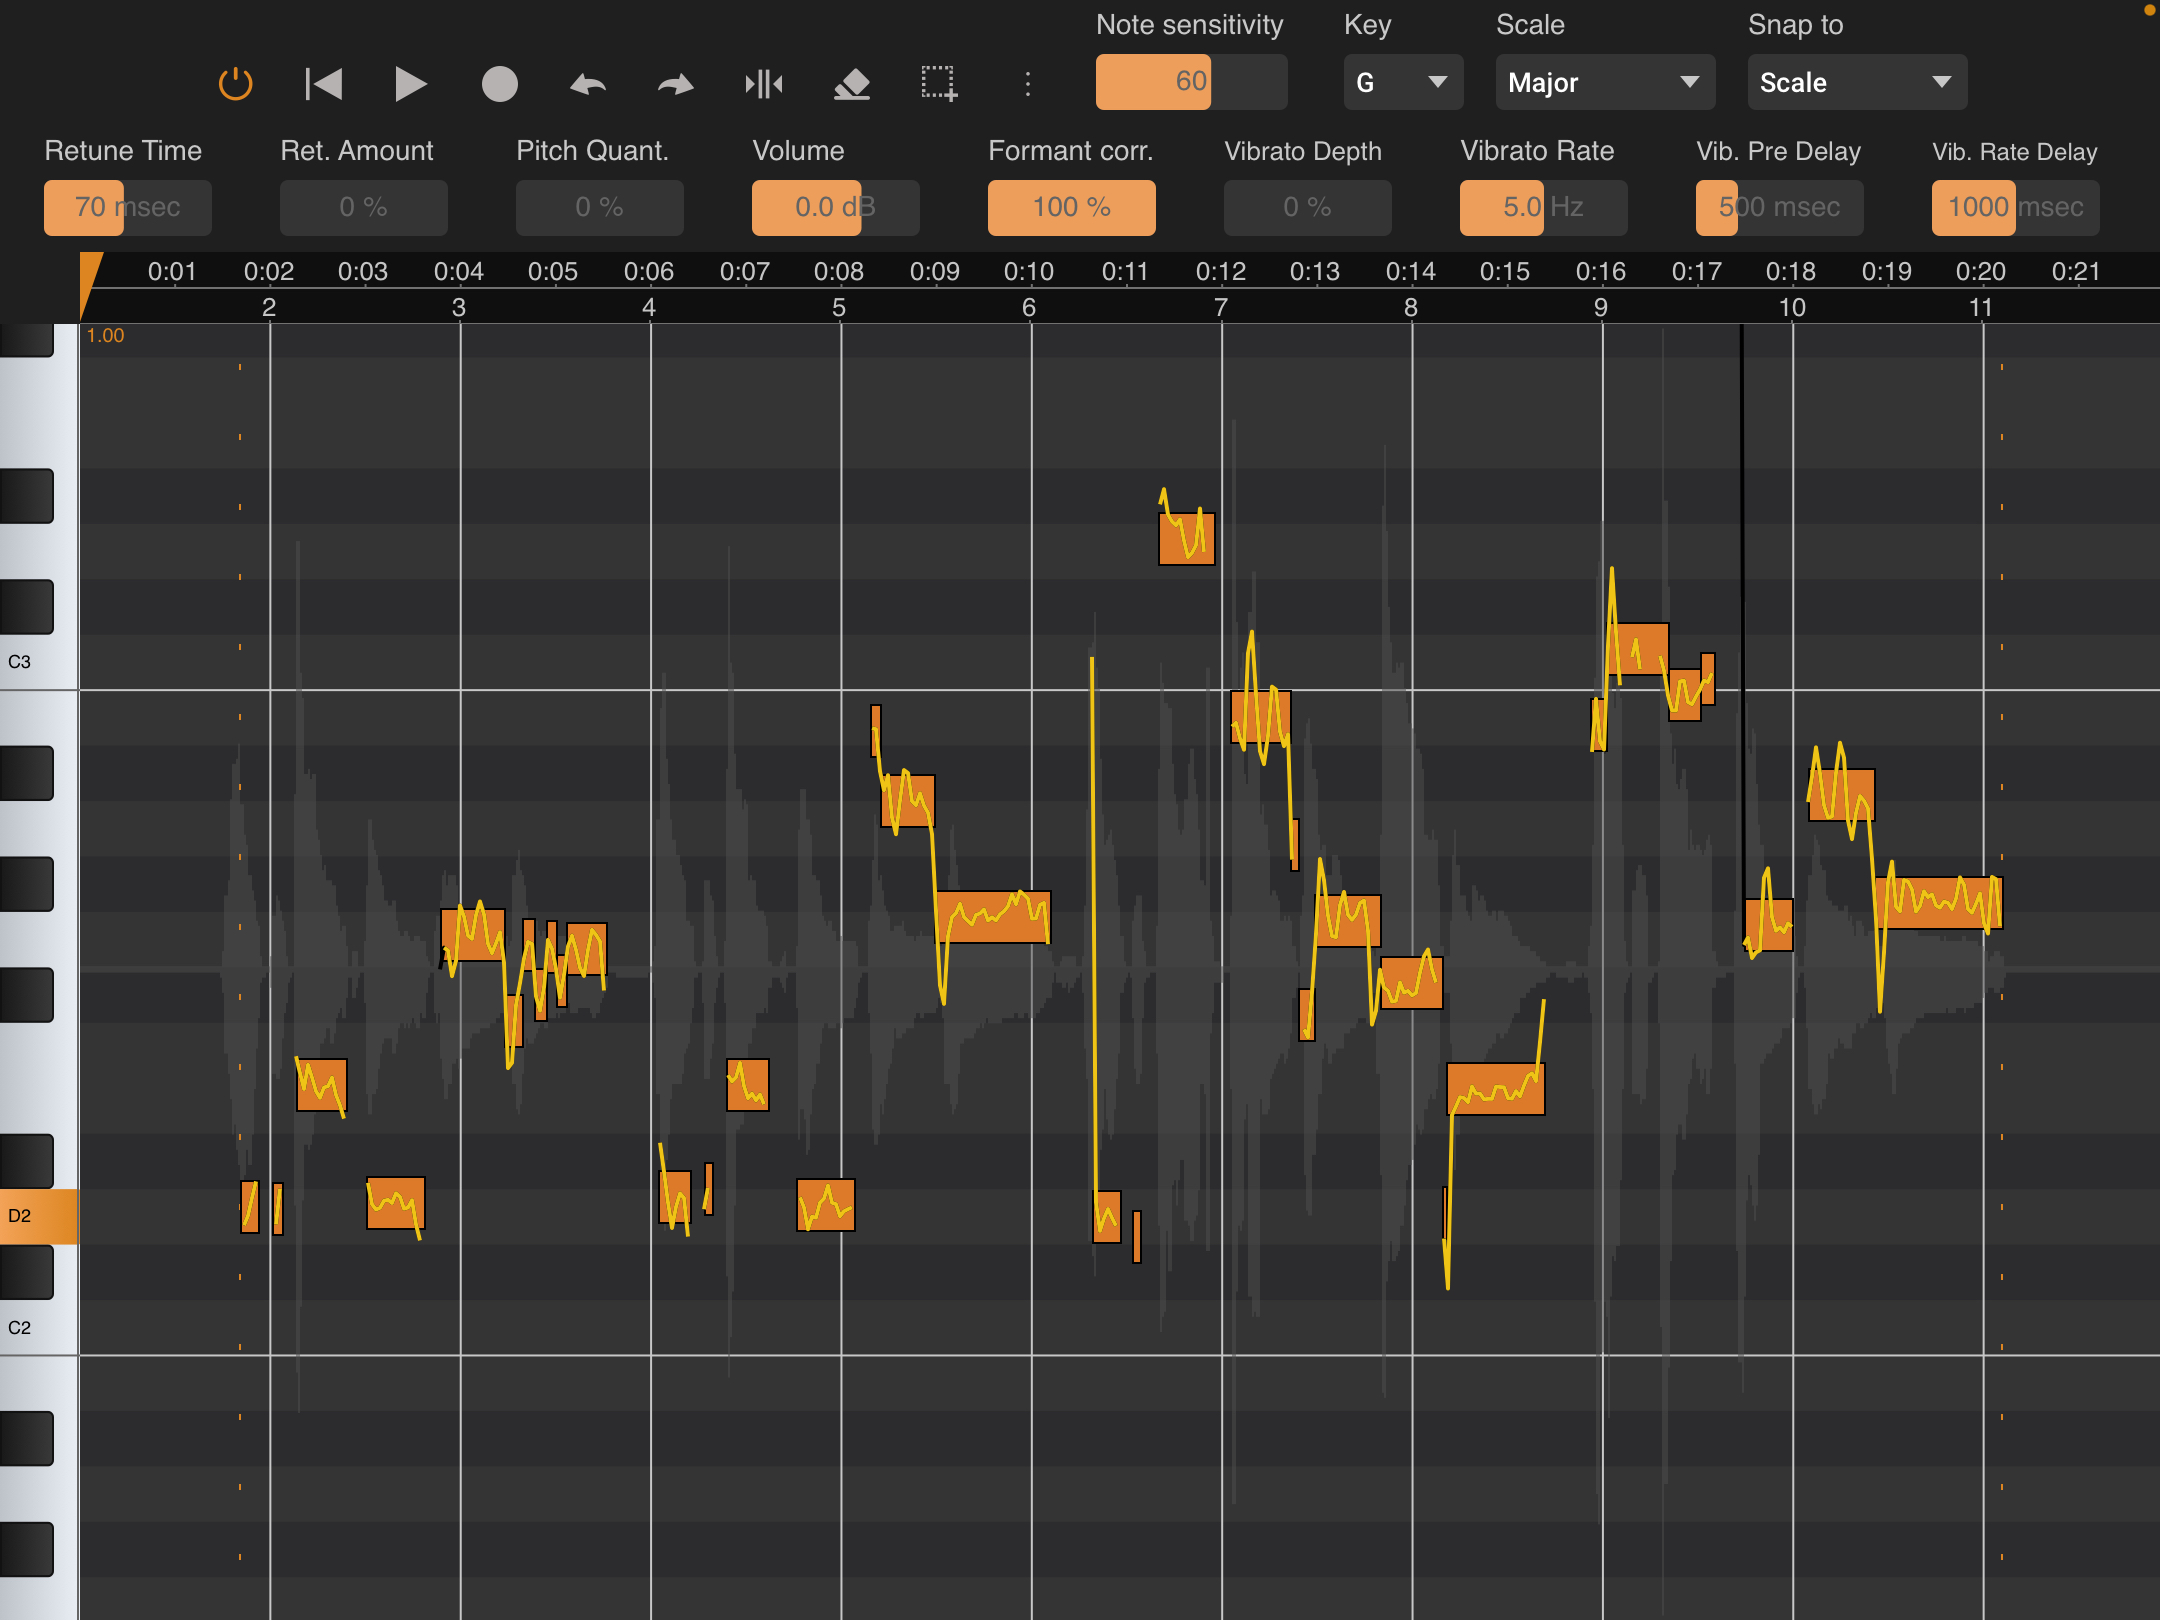
Key to this mode is the additional parameter which becomes available for a selected note or notes - Pitch Quantization ![]() . This parameter can be found between Retune Amount and Volume and will initially be set at 0% for all notes when the Vocal Tune Studio launches in this mode, as can be seen in the screenshot above where all notes have been selected using Select all
. This parameter can be found between Retune Amount and Volume and will initially be set at 0% for all notes when the Vocal Tune Studio launches in this mode, as can be seen in the screenshot above where all notes have been selected using Select all ![]() , because no pitch quantization is initially taking place.
, because no pitch quantization is initially taking place.
Quantization is the process of mapping continuous infinite values (in this case, audio frequency/pitch) into discrete sets of finite values (in this case, the exact frequencies we define as particular musical notes). The default Pitch and Time mode within Vocal Tune Studio uses quantized notes when retuning (although notes can be moved out of a quantized position using the 'Free' Snap to mode).
The Pitch Quantization parameter, though, allows you to move the target pitch for the retuning from its original position (as sung, 0% quantization) to a fully 100% quantized position where the target retuning pitch is exactly the frequency of the nearest note within the selected key and scale. If, as in the screenshot above, you select all of the notes and move the Pitch Quantization slider up and down, you will see this in action as the notes are moved ever closer to being exactly in the note positions as defined by the grid as the quantization is increased (doing this can also easily identify notes which are so close to being the quantized pitch - they will barely move as you moved the Pitch Quantization slider up and down - that you may decide its better to leave them without any retuning at all to preserve the most natural sound overall) .
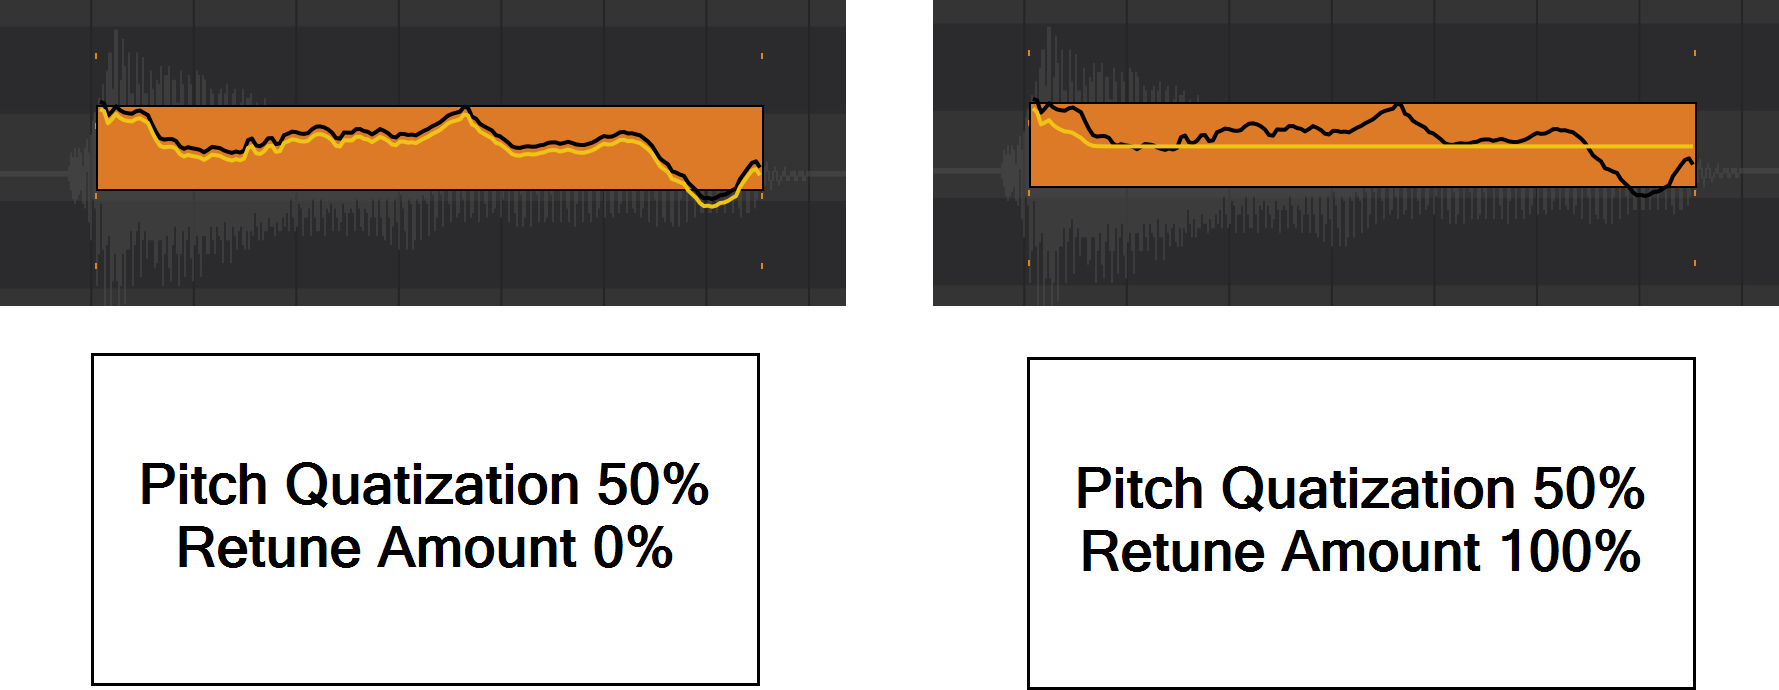
You will also notice that initially in this mode the Retune Amount ![]() parameter is set to 0% for all notes. The Pitch Quantization allows you to set the target pitch for the retuning. Just as in the default Pitch And Time mode, the Retune Amount allows you to decide how many of the fluctuations in pitch from your original performance remain within that retuned note. For example, a note retuned to its target pitch with a Retune Amount of 0% will have all of the fluctuations of the original performance around that target pitch. A note retuned to its target pitch with a Retune Amount of 100% will have all of those fluctuations smoothed out so that it is exactly and consistently that target pitch. You can see this illustrated in the images below. The Pitch Quantization for both has been set at 50%, so the target pitch is halfway between the pitch as sung and the fully quantized nearest note within the key and scale on the grid. On the left, the Retune Amount has been left at 0% so you can see how the target pitch has been moved down slightly towards being fully quantized but retains all of the fluctuations of the original performance: the yellow retuned line sits below the original pitch line in black but retains exactly the same shape. By contrast, on the right, the Retune Amount has been set to the extreme of 100% so here the same target pitch has been selected, but all of the fluctuations of the original performance have been ironed out in the retuned pitch: the yellow line sits below the original pitch but is completely flat at exactly the target pitch throughout the note (except at the beginning of the note as a result of the default Retune Time being active).
parameter is set to 0% for all notes. The Pitch Quantization allows you to set the target pitch for the retuning. Just as in the default Pitch And Time mode, the Retune Amount allows you to decide how many of the fluctuations in pitch from your original performance remain within that retuned note. For example, a note retuned to its target pitch with a Retune Amount of 0% will have all of the fluctuations of the original performance around that target pitch. A note retuned to its target pitch with a Retune Amount of 100% will have all of those fluctuations smoothed out so that it is exactly and consistently that target pitch. You can see this illustrated in the images below. The Pitch Quantization for both has been set at 50%, so the target pitch is halfway between the pitch as sung and the fully quantized nearest note within the key and scale on the grid. On the left, the Retune Amount has been left at 0% so you can see how the target pitch has been moved down slightly towards being fully quantized but retains all of the fluctuations of the original performance: the yellow retuned line sits below the original pitch line in black but retains exactly the same shape. By contrast, on the right, the Retune Amount has been set to the extreme of 100% so here the same target pitch has been selected, but all of the fluctuations of the original performance have been ironed out in the retuned pitch: the yellow line sits below the original pitch but is completely flat at exactly the target pitch throughout the note (except at the beginning of the note as a result of the default Retune Time being active).
Though similar results can be achieved using the 'Free' Snap to mode and Retune Amount in the default Pitch and Time mode, in this mode, the interaction between Pitch Quantization and Retune Amount gives you more control overall for subtle retuning whilst maintaining the original performance fluctuations and corrected to the key and scale. Within the default mode, a Retune Amount of 0% will give you the original pitch as originally sung with all of its fluctuations. Increasing the value of the Retune Amount slider will incrementally remove the fluctuations until, at 100%, it will retune the vocal to exactly the quantized pitch, smoothing out all of the original fluctuations. In this 'Start without retuning' mode, however, because you can carefully set the target pitch for retuning using the Pitch Quantization slider first, you can retune to that target pitch AND have all of the fluctuations of the original performance still present (if desired) whereas the default mode can, generally speaking, only have that 'all fluctuations' state for the original pitch as sung.
Please note that, in this mode, once a note or notes have been moved to a completely different pitch on the grid by the user sliding it/them, the Pitch Quantization slider will become unavailable for that note or notes.