The Arranger Screen Expert Mode
The Arranger Screen is the first thing you'll see when you launch Audio Evolution Mobile. This is your central hub from where you can access all other areas of the application. From here you can set up your project, add tracks, record and import audio or MIDI, edit tracks, access effects and virtual instruments and get everything ready for the final mixdown phase.
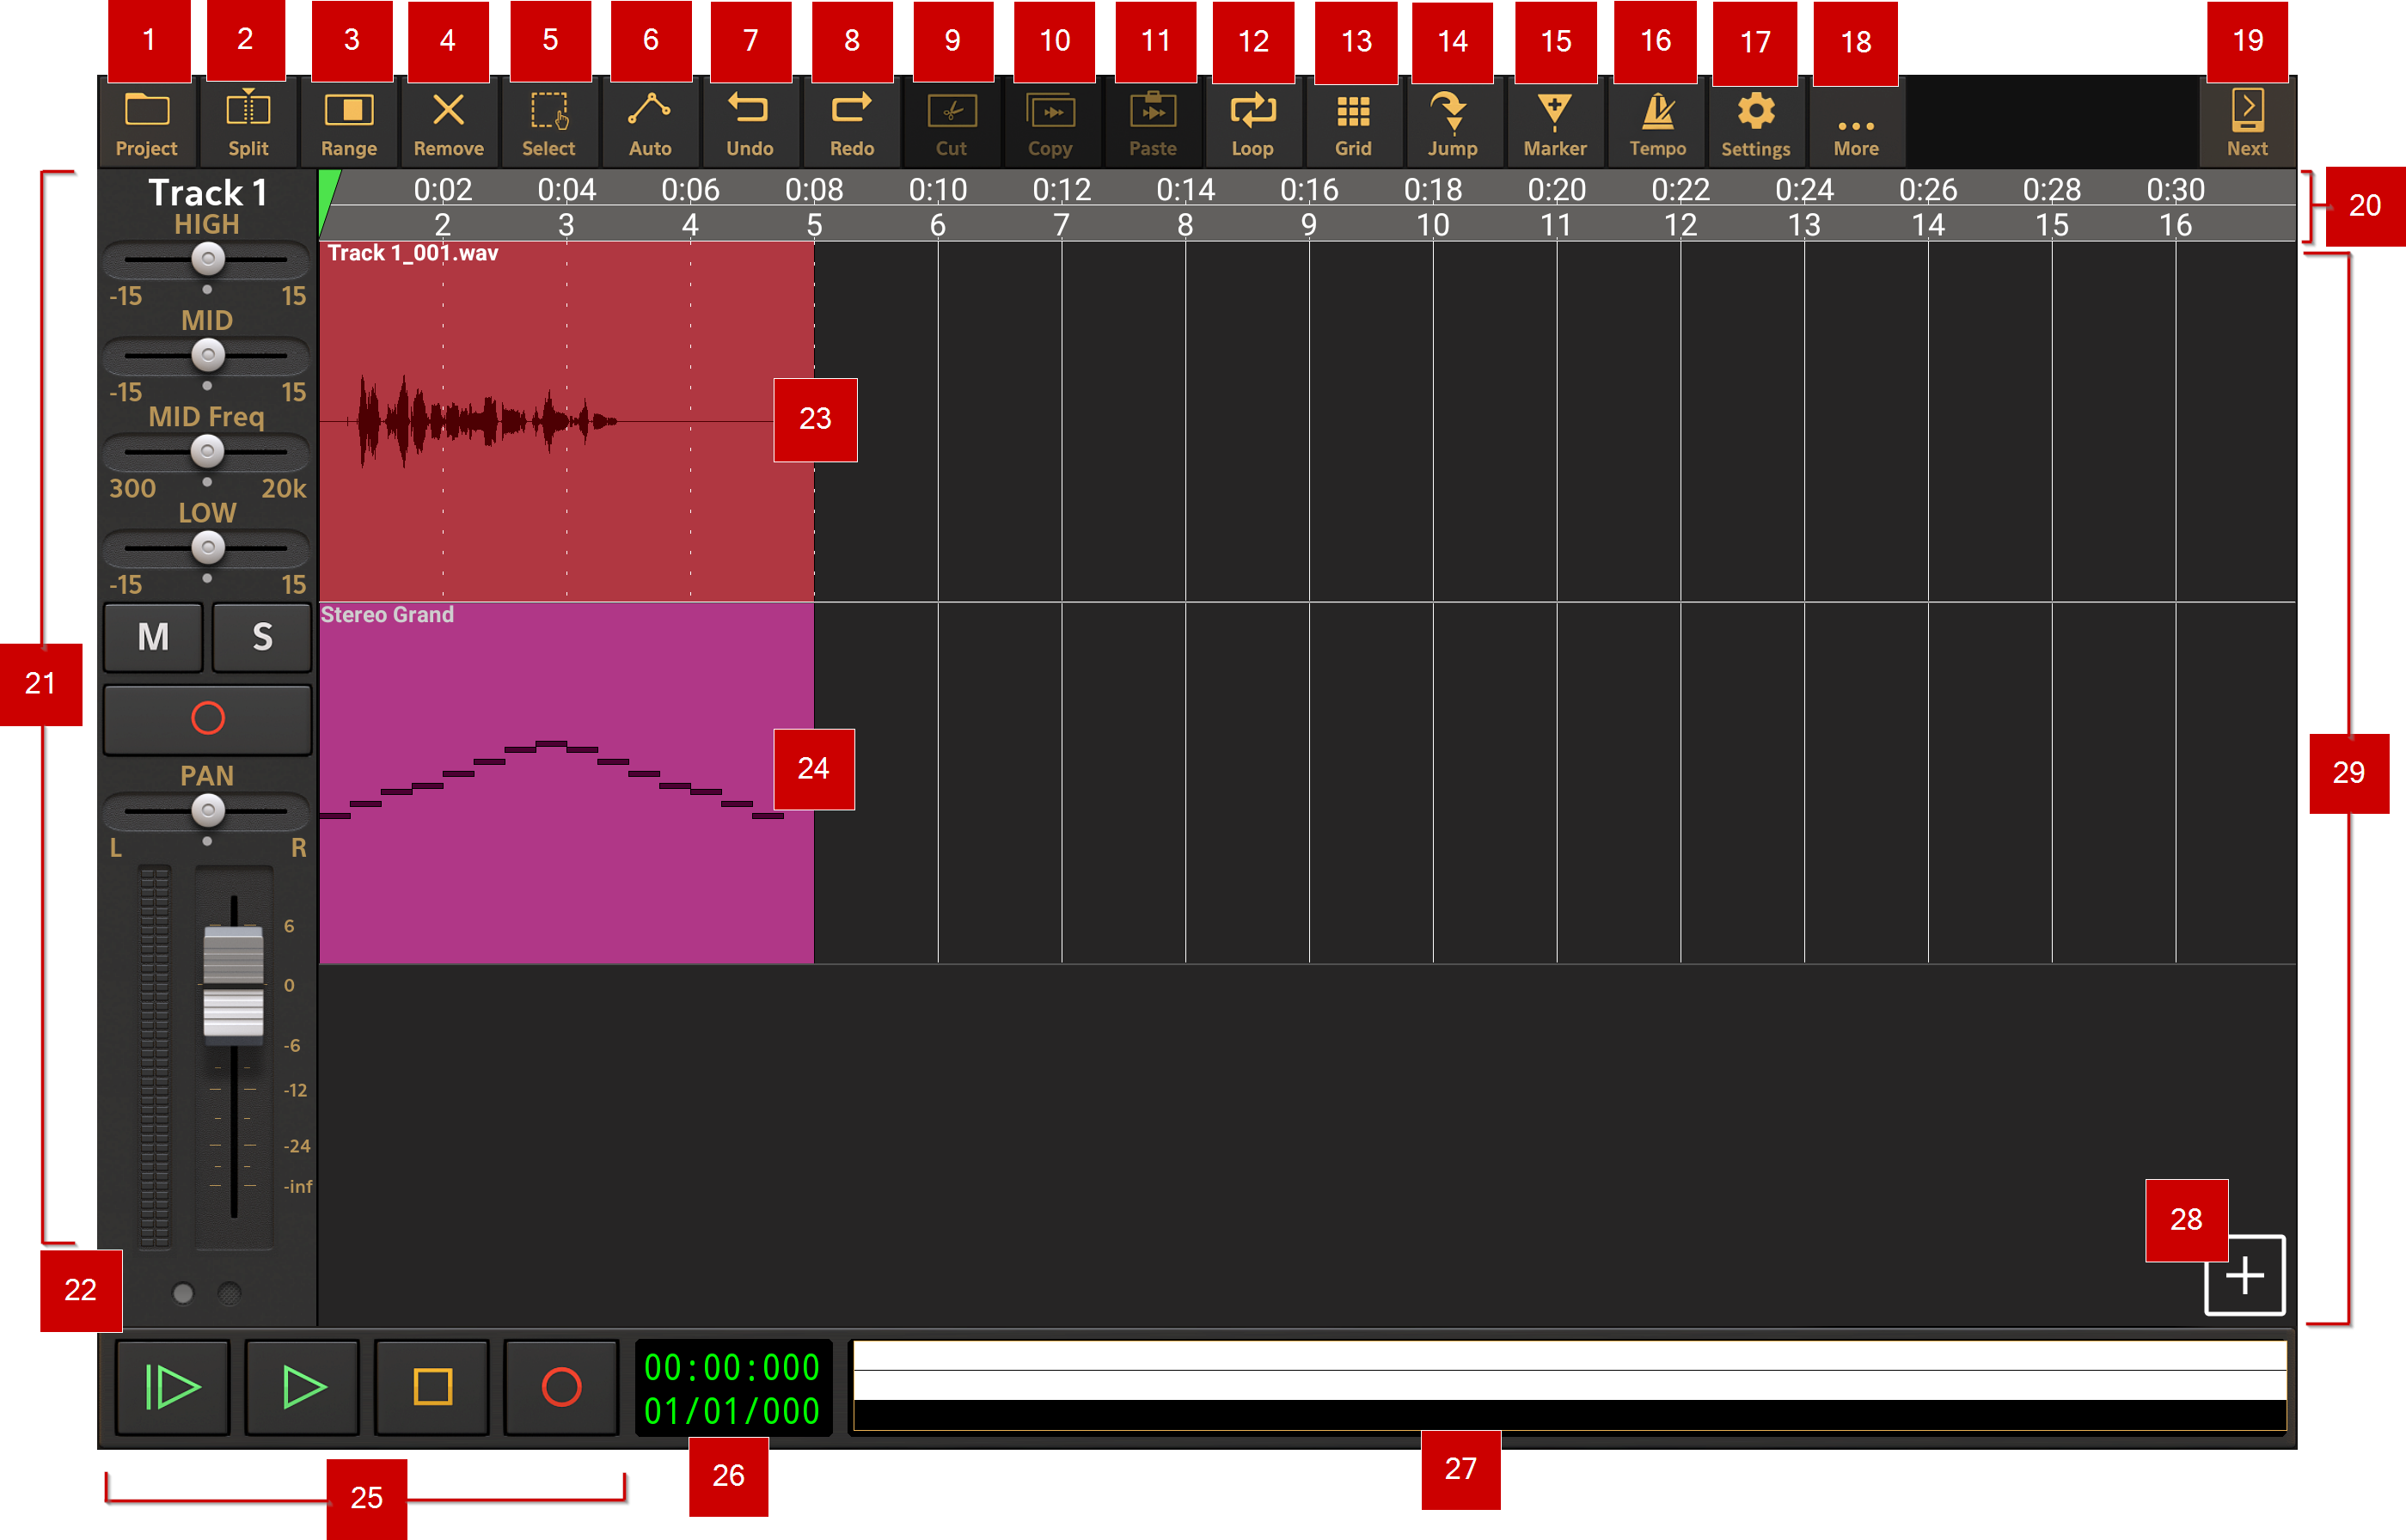
NOTE. The number of buttons which appear on along the top of the Arranger Screen will vary according to your device's screen size. If you do not see some of the buttons displayed here, their functions can be accessed via the More ![]() button.
button.
1 Project options button ![]() . Pressing this button opens the Project Options panel. This is where you can set up, load and save your projects, import audio and MIDI, export your tracks and final mixdown and access the cloud sync backup feature. For more information see here.
. Pressing this button opens the Project Options panel. This is where you can set up, load and save your projects, import audio and MIDI, export your tracks and final mixdown and access the cloud sync backup feature. For more information see here.
2 Split button ![]() . This allows you to split clips into multiple smaller clips when needed. How this happens depends on the Split button behavior setting which is selectable between Mode or Action via Settings > User Interface > Split button behavior.
. This allows you to split clips into multiple smaller clips when needed. How this happens depends on the Split button behavior setting which is selectable between Mode or Action via Settings > User Interface > Split button behavior.
To split a clip using the Mode Split button behavior (this is the default setting), press the Split button to enter split mode. Whilst in split mode, tap on any clip and that clip will be split into two separate clips at the point at which you tapped. As a single tap like that can lack accuracy, it is generally better, though, to tap, hold and slide to position the vertical dotted white line, which will appear once you tap and hold, to exactly the point at which you want the split to occur. Once you release your finger, the clip will be split at the position of the vertical dotted line. For greater accuracy, zoom into the clip by resizing it using two fingers to pinch/pull. As always, remember the Grid ![]() and snap-to functionality if you want to easily position the vertical dotted line at an exact increment of the tempo. Turn the Grid snap-to functionality off to position the vertical dotted line freely.
and snap-to functionality if you want to easily position the vertical dotted line at an exact increment of the tempo. Turn the Grid snap-to functionality off to position the vertical dotted line freely.
When using Action Split button behavior, you split the currently selected clips into separate clips at the point defined by the position of the Time Marker - the green marker ![]() shown in the Timeline/Marker Display which can be freely positioned by tapping the Timeline/Marker Display, by grabbing the Time Marker and sliding it, or by sliding your finger within the Project Overview/ Scrollpad, which will let you move the Time Marker without it being obscured by your finger as you do so. For greater accuracy, zoom into the clip by resizing it using two fingers to pinch/pull. Once the Time Marker is positioned, press the Split button and the selected clip(s) will be split at that point. When Action Split button behavior is selected, the split button will be grayed out on the Arranger Screen until a clip is selected.
shown in the Timeline/Marker Display which can be freely positioned by tapping the Timeline/Marker Display, by grabbing the Time Marker and sliding it, or by sliding your finger within the Project Overview/ Scrollpad, which will let you move the Time Marker without it being obscured by your finger as you do so. For greater accuracy, zoom into the clip by resizing it using two fingers to pinch/pull. Once the Time Marker is positioned, press the Split button and the selected clip(s) will be split at that point. When Action Split button behavior is selected, the split button will be grayed out on the Arranger Screen until a clip is selected.
For more information about editing audio clips, see here. For more information about editing MIDI clips, see here.
3 Press the Remove ![]() button to activate the Remove mode. When active, this mode allows you to easily and quickly remove any clip you tap in your project. Use the Undo button if you accidentally remove a clip you meant to keep. Press the Remove button again to deactivate the mode.
button to activate the Remove mode. When active, this mode allows you to easily and quickly remove any clip you tap in your project. Use the Undo button if you accidentally remove a clip you meant to keep. Press the Remove button again to deactivate the mode.
4 Range mode button ![]() . This button turns on the track Range mode on and off. When Range mode is on, you can use your finger to select a time range within one track or across multiple tracks. With Range mode on, touch where you would like the range to start and hold/slide to the right on the track you want to select part of (or start on the end and hold/slide left to the desired starting point). If you want to select a range across multiple tracks, also slide up or down to include those tracks in the range selection as you do so. Once the selection is made, should you need to adjust it, press and hold near the edge of the blue range selection and slide to reposition that edge. As always, zoom in for greater accuracy. Tap once outside of the range selection to deselect it completely. Tap once within the blue range selection to open the Range Options or use the Cut or Copy buttons to cut or copy the selected range. For more information on the range options, see here.
. This button turns on the track Range mode on and off. When Range mode is on, you can use your finger to select a time range within one track or across multiple tracks. With Range mode on, touch where you would like the range to start and hold/slide to the right on the track you want to select part of (or start on the end and hold/slide left to the desired starting point). If you want to select a range across multiple tracks, also slide up or down to include those tracks in the range selection as you do so. Once the selection is made, should you need to adjust it, press and hold near the edge of the blue range selection and slide to reposition that edge. As always, zoom in for greater accuracy. Tap once outside of the range selection to deselect it completely. Tap once within the blue range selection to open the Range Options or use the Cut or Copy buttons to cut or copy the selected range. For more information on the range options, see here.
5 Select mode button ![]() . Switching on the Select mode allows you to select more than one clip at a time, either within one track or across many tracks. Press the Select mode button to engage the mode. Then touch the clips you wish to select one by one or, alternatively, long press and use the rectangular marquee that appears to select a whole area of clips. Once you have your clips selected, press the Select button again to turn off the select mode. Now you have all of your chosen clips selected at the same time, allowing you to trim (using the handles at either end of one of the selected clips), move (by dragging one of the selected clips) and alter the clip volume (using the white volume envelope sliders at the top of the selected clips) of all of them simultaneously. Tap once outside the selected clips to deselect them all.
. Switching on the Select mode allows you to select more than one clip at a time, either within one track or across many tracks. Press the Select mode button to engage the mode. Then touch the clips you wish to select one by one or, alternatively, long press and use the rectangular marquee that appears to select a whole area of clips. Once you have your clips selected, press the Select button again to turn off the select mode. Now you have all of your chosen clips selected at the same time, allowing you to trim (using the handles at either end of one of the selected clips), move (by dragging one of the selected clips) and alter the clip volume (using the white volume envelope sliders at the top of the selected clips) of all of them simultaneously. Tap once outside the selected clips to deselect them all.
6 Automation mode button ![]() . Clicking on this button turns on the Automation Mode view. This allows you to create and edit parameter automation for your tracks as well as their connected virtual instruments and effects. You can also apply automation to the Master track and Groups/Buses which is always displayed at the bottom of the tracks shown in the Timeline Area when in automation mode view. Automation can also be created using the Touch Mode. For more information on Automation in Audio Evolution Mobile see here.
. Clicking on this button turns on the Automation Mode view. This allows you to create and edit parameter automation for your tracks as well as their connected virtual instruments and effects. You can also apply automation to the Master track and Groups/Buses which is always displayed at the bottom of the tracks shown in the Timeline Area when in automation mode view. Automation can also be created using the Touch Mode. For more information on Automation in Audio Evolution Mobile see here.
7 Undo button ![]() . Pressing this button undoes the last edit made on the clips and tracks within the Timeline Area should you make a mistake. The undo stack is unlimited, so you can undo all the way back to when you started editing. The Undo list is emptied when the app is closed closed or a new project is loaded and will therefore be empty when the app is next launched. Please note that mixer setting changes are not affected by undo/redo.
. Pressing this button undoes the last edit made on the clips and tracks within the Timeline Area should you make a mistake. The undo stack is unlimited, so you can undo all the way back to when you started editing. The Undo list is emptied when the app is closed closed or a new project is loaded and will therefore be empty when the app is next launched. Please note that mixer setting changes are not affected by undo/redo.
8 Redo button ![]() . Pressing this button re-applies the last edit undone using the Undo button as long as no further edits have taken place since using the Undo function.
. Pressing this button re-applies the last edit undone using the Undo button as long as no further edits have taken place since using the Undo function.
9 Cut button ![]() . The Cut button allows you to cut (remove) the selected clip or the Range selected. When cutting a Range you will be given the option to either Cut, which clears the selected area leaving an empty space, or Cut (ripple), which cuts the selected area after which everything to the right of the selected area is shifted left by the amount/length of the clip or range cut.
. The Cut button allows you to cut (remove) the selected clip or the Range selected. When cutting a Range you will be given the option to either Cut, which clears the selected area leaving an empty space, or Cut (ripple), which cuts the selected area after which everything to the right of the selected area is shifted left by the amount/length of the clip or range cut.
10 Copy button ![]() . The Copy button allows you to copy the selected clip or Range to the clipboard. The clipboard only holds one selection at a time so copying another will overwrite the first. Please note that this is an internal clipboard, not a system wide clipboard, so you cannot paste the contents of the clipboard outside of the app.
. The Copy button allows you to copy the selected clip or Range to the clipboard. The clipboard only holds one selection at a time so copying another will overwrite the first. Please note that this is an internal clipboard, not a system wide clipboard, so you cannot paste the contents of the clipboard outside of the app.
11 Paste button ![]() . The Paste button will paste the currently copied clip(s) or Range to the specified location as a separate clip or separate clips (if there were multiple present on the clipboard). To select the point at which to paste, first select the desired track by tapping on it. Then position the Time Marker (the green marker
. The Paste button will paste the currently copied clip(s) or Range to the specified location as a separate clip or separate clips (if there were multiple present on the clipboard). To select the point at which to paste, first select the desired track by tapping on it. Then position the Time Marker (the green marker ![]() ) by tapping once at the desired point on the Timeline/Marker Display or by grabbing hold of the Time Marker and sliding it. Zoom into the clip using pull/pinch for greater accuracy. Then press the Paste button and the copied content from the clipboard will be pasted at the point defined. If the location specified already contains content, you will be asked if you'd like to Paste or Paste (insert). Selecting Paste will 'remove' any content present underneath the content pasted. If the copied content happens to be pasted on top of and completely within the duration of a single clip on the timeline, that clip will be split into two clips, both trimmed to accommodate the pasted content (the clip's original content is still there though if you use the Clip Trimming Handles to trim the original clip/s). Selecting Paste (insert) will insert your copied content at the point specified and shift everything originally after that point to the right by the duration of the pasted content so it is now heard after the inserted content and nothing is removed.
) by tapping once at the desired point on the Timeline/Marker Display or by grabbing hold of the Time Marker and sliding it. Zoom into the clip using pull/pinch for greater accuracy. Then press the Paste button and the copied content from the clipboard will be pasted at the point defined. If the location specified already contains content, you will be asked if you'd like to Paste or Paste (insert). Selecting Paste will 'remove' any content present underneath the content pasted. If the copied content happens to be pasted on top of and completely within the duration of a single clip on the timeline, that clip will be split into two clips, both trimmed to accommodate the pasted content (the clip's original content is still there though if you use the Clip Trimming Handles to trim the original clip/s). Selecting Paste (insert) will insert your copied content at the point specified and shift everything originally after that point to the right by the duration of the pasted content so it is now heard after the inserted content and nothing is removed.
12 Loop mode button ![]() . The Loop button switches the loop mode on and off. When active, playback will be continually looped between the two yellow loop marker points
. The Loop button switches the loop mode on and off. When active, playback will be continually looped between the two yellow loop marker points ![]() , which are shown in the Timeline/Marker Display when loop mode is on. Loop marker points are set by touching and sliding them to the desired point in the Timeline. To more easily set your loop points accurately, it can be helpful to use the Grid and Snap-to-Grid options. There is also a convenient option in the Clip/Track Options (accessed by selecting a clip and tapping on the three-dot button shown within the clip - zoom in further using pull/pinch if the clip isn't big enough to display the three-dot button initially) to automatically set the loop points to the boundaries of that particular clip.
, which are shown in the Timeline/Marker Display when loop mode is on. Loop marker points are set by touching and sliding them to the desired point in the Timeline. To more easily set your loop points accurately, it can be helpful to use the Grid and Snap-to-Grid options. There is also a convenient option in the Clip/Track Options (accessed by selecting a clip and tapping on the three-dot button shown within the clip - zoom in further using pull/pinch if the clip isn't big enough to display the three-dot button initially) to automatically set the loop points to the boundaries of that particular clip.
13 Grid button ![]() . The Grid button allows you to show or hide the visual tempo grid within the Timeline Area and customize its properties. In the screenshot above, the grid is shown displaying one bar length increments. Pressing the Grid button opens the Grid Options seen here.
. The Grid button allows you to show or hide the visual tempo grid within the Timeline Area and customize its properties. In the screenshot above, the grid is shown displaying one bar length increments. Pressing the Grid button opens the Grid Options seen here.
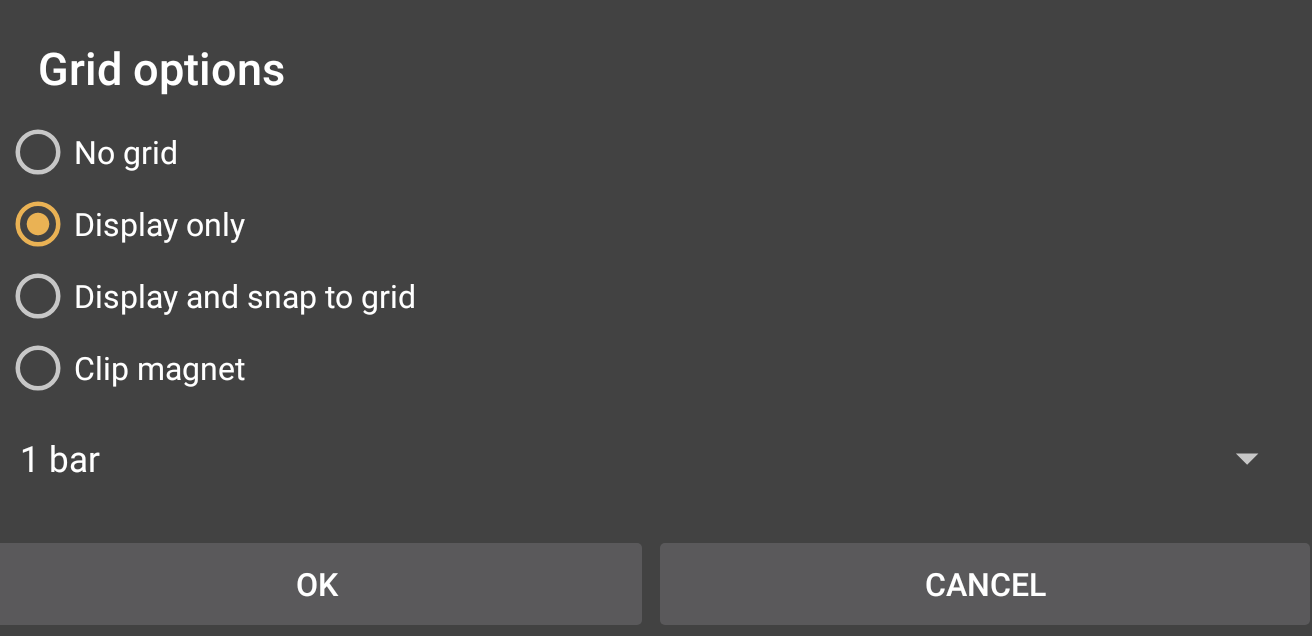
As can be seen, you can choose to have no grid displayed, have only the grid displayed, or display the grid with snap-to-grid functionality. Snap-to-grid can be very useful when moving clips, positioning the Time Marker, loop marker points or other markers and when selecting a Range. There is also the option to turn the Clip magnet function on. This can be extremely useful when you want to select the exact beginning, or end of a clip on the Timeline/Marker Display and when you want to place clips seamlessly next to each other. The clip magnet function works across multiple tracks, not just on the track selected, meaning you can easily make exact selections, or positionings, based on the clips on other tracks.
The increments used for the grid are either divisions of the current tempo, ranging from 1 bar to 1/32nd triplet beat, or, 24 or 25 frames per second which are particularly useful if you are working on music for, or working on the soundtrack of, a film or video. The actual grid increments you see displayed will depend on the available screen space so you may need to zoom in further using pinch/pull to see the smallest divisions. That said, snap-to-grid always snaps to the defined increments even if the grid lines are not currently being displayed.
14 Jump button ![]() . The Jump button opens the 'Jump to' options seen below.
. The Jump button opens the 'Jump to' options seen below.
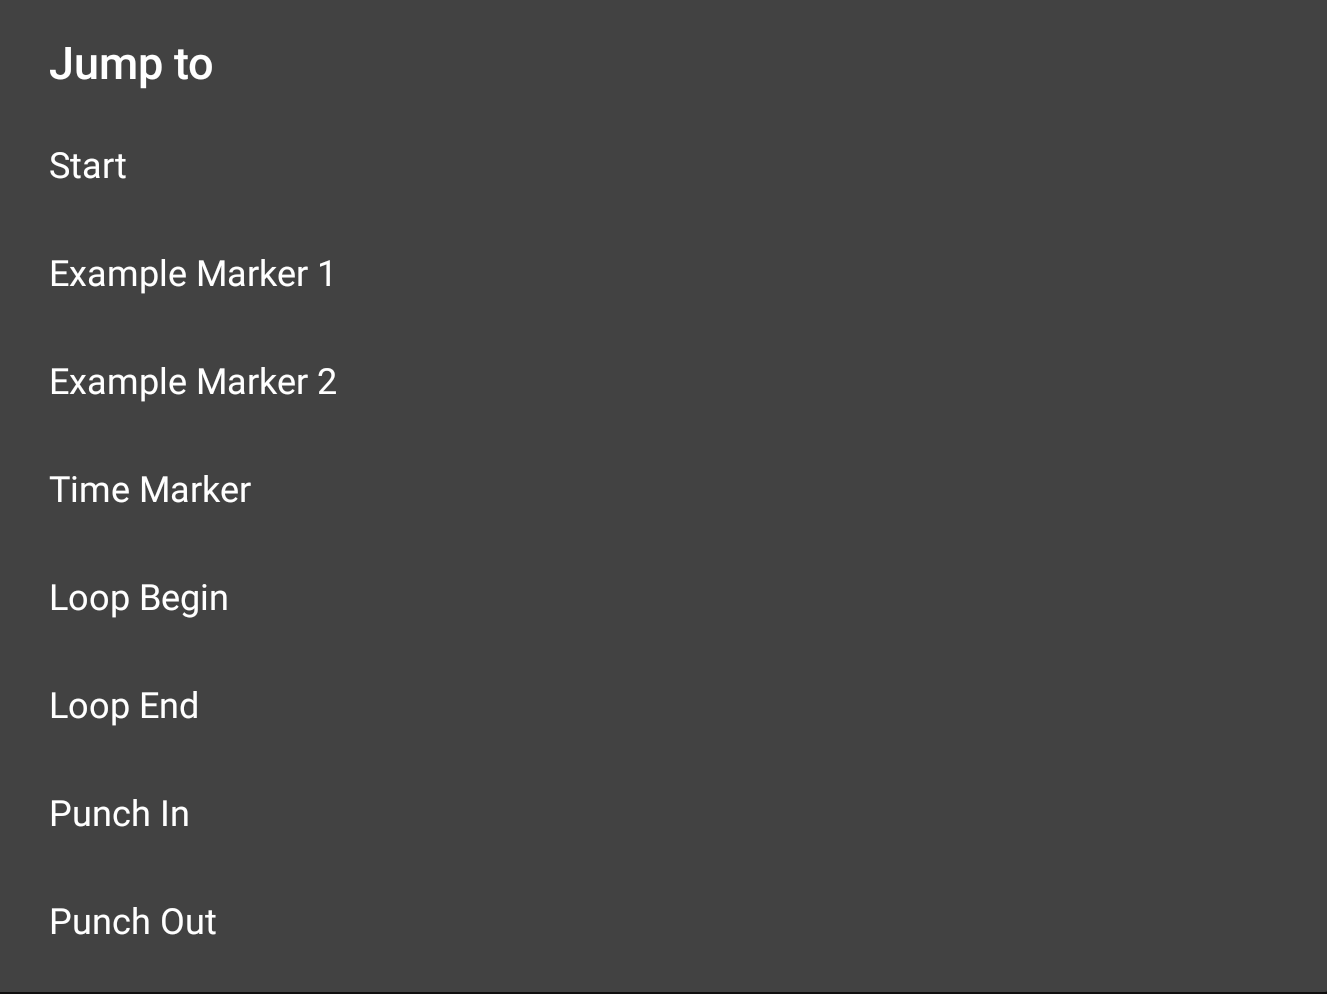
The 'Jump to' function allows you to very easily and quickly jump to particular points you have defined in your project. Selecting one of the options jumps your viewpoint to that point in the timeline and also moves the Time Marker to that point.
Selecting Start jumps you and the Time Marker to the start of the project.
Any Markers you create yourself, shown on the Timeline/Marker Display in blue as seen here ![]() , are included in the 'Jump to' options. You can name your markers anything you want: here the two markers have been renamed 'Example Marker 1' and 'Example Marker 2'. You can choose whether the Marker numbers or Marker names
, are included in the 'Jump to' options. You can name your markers anything you want: here the two markers have been renamed 'Example Marker 1' and 'Example Marker 2'. You can choose whether the Marker numbers or Marker names ![]() are displayed in the User Interface section of the Settings. Selecting a Marker in the 'Jump to' options jumps your viewpoint and the Time Marker to that point.
are displayed in the User Interface section of the Settings. Selecting a Marker in the 'Jump to' options jumps your viewpoint and the Time Marker to that point.
Selecting Time Marker jumps you to the current position of the green Time Marker ![]() should you have scrolled through your project so that it is not currently visible.
should you have scrolled through your project so that it is not currently visible.
Selecting Loop Begin and Loop End jump you and the Time Marker to the loop points displayed in yellow ![]() . The Loop mode doesn't need to be active, and the loop points to be visible, for this to happen.
. The Loop mode doesn't need to be active, and the loop points to be visible, for this to happen.
Also listed as options are the Punch In and Punch Out point if they have been set. Punch In/Out points are shown in red on the Timeline/Marker display as seen here ![]() . Selecting them in the 'Jump to' options jumps you and the Time Marker to that point. For more information on Punch In/Out see here.
. Selecting them in the 'Jump to' options jumps you and the Time Marker to that point. For more information on Punch In/Out see here.
15 Marker button ![]() . The Marker button allows you to easily place a blue marker at the current position of the Time Marker
. The Marker button allows you to easily place a blue marker at the current position of the Time Marker ![]() . Position the Time Marker by tapping once in the Timeline/Marker Display, by touching it and sliding to the desired point, or by using the Project Overview/Scrollpad which will let you move the Time Marker without it being obscured by your finger as you do so. For greater accuracy, zoom in using pull/pinch. Once you have the Time Marker correctly positioned, press the Marker button and your marker will be placed at that point and the Name Marker dialog will open to allow you to give your marker a descriptive name if necessary. You can choose whether Audio Evolution Mobile displays marker numbers
. Position the Time Marker by tapping once in the Timeline/Marker Display, by touching it and sliding to the desired point, or by using the Project Overview/Scrollpad which will let you move the Time Marker without it being obscured by your finger as you do so. For greater accuracy, zoom in using pull/pinch. Once you have the Time Marker correctly positioned, press the Marker button and your marker will be placed at that point and the Name Marker dialog will open to allow you to give your marker a descriptive name if necessary. You can choose whether Audio Evolution Mobile displays marker numbers ![]() or names
or names ![]() in the Timeline/Marker Display in the User Interface section of the Settings. Markers can be moved by touching and sliding them unless they have been locked in place using the Marker Options (double click on the Timeline/Marker Display to open the Marker Options).
in the Timeline/Marker Display in the User Interface section of the Settings. Markers can be moved by touching and sliding them unless they have been locked in place using the Marker Options (double click on the Timeline/Marker Display to open the Marker Options).
NOTE. Markers can also be placed by double clicking on the Timeline/Marker Display. This will move the Time Marker to the place clicked on and open up the Marker Options from where you can access various options including adding a marker at that point. For more information on this, see here.
16 Tempo button ![]() . Pressing the Tempo button opens up the project tempo settings. For more information on this, see here.
. Pressing the Tempo button opens up the project tempo settings. For more information on this, see here.
17 Settings button ![]() . Pressing the Settings button opens up the Audio Evolution Mobile settings options. Audio Evolution Mobile gives you many choices to help tailor your experience across the categories of Audio, User Interface, Mixer Channel Display, USB Audio, USB MIDI and Other.
. Pressing the Settings button opens up the Audio Evolution Mobile settings options. Audio Evolution Mobile gives you many choices to help tailor your experience across the categories of Audio, User Interface, Mixer Channel Display, USB Audio, USB MIDI and Other.
18 More button ![]() . The More button will display various options depending on the size of your device's screen. If your screen is too small to display all of the buttons across the top of the Arranger Screen as shown in the screenshot above, the functions of those which can't be seen can be accessed via the More button. In addition to those functions, you will notice there is also Options. Selecting Options opens this pop-up screen, allowing you to access the various functions listed.
. The More button will display various options depending on the size of your device's screen. If your screen is too small to display all of the buttons across the top of the Arranger Screen as shown in the screenshot above, the functions of those which can't be seen can be accessed via the More button. In addition to those functions, you will notice there is also Options. Selecting Options opens this pop-up screen, allowing you to access the various functions listed.
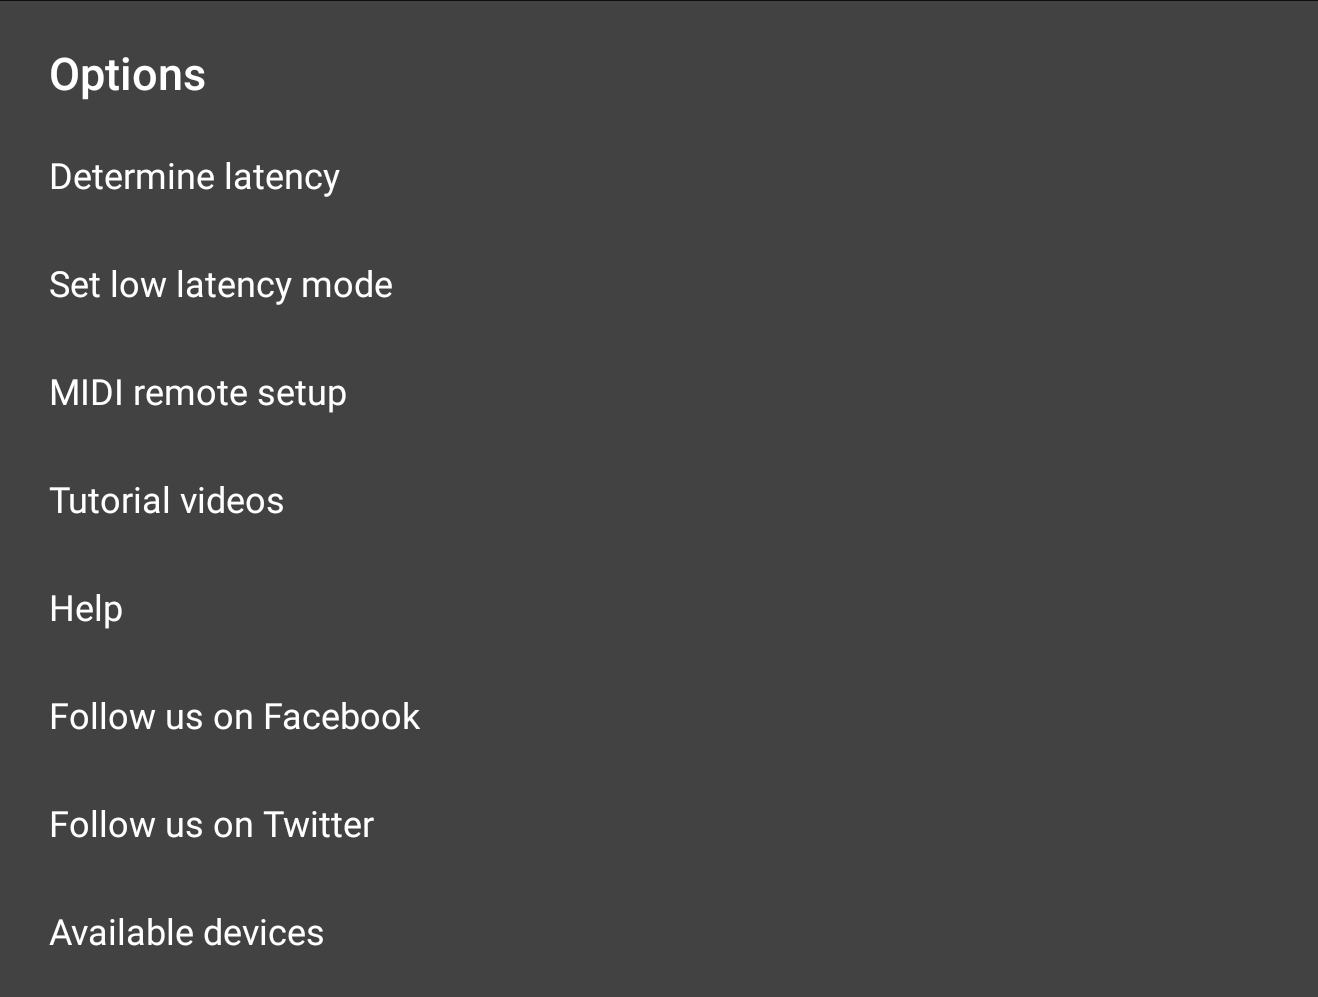
If your device screen is big enough to display all of the buttons along the top of the Arranger Screen, pressing the More button will immediately open the Options pop-up shown above.
19 Next button ![]() . The Next button is used to move from the Arranger Screen to the next screen - the Track Mixer screen. Pressing the Next button on the Track Mixer screen will take you to the Master and Groups Mixer screen. Pressing the Next button on that screen takes you back to the Arranger Screen (unless you have a USB audio interface connected which exposes its internal controls such as input gain and volume. If so, you will be taken to the Hardware Mixer screen before being taken back to the Arranger Screen.).
. The Next button is used to move from the Arranger Screen to the next screen - the Track Mixer screen. Pressing the Next button on the Track Mixer screen will take you to the Master and Groups Mixer screen. Pressing the Next button on that screen takes you back to the Arranger Screen (unless you have a USB audio interface connected which exposes its internal controls such as input gain and volume. If so, you will be taken to the Hardware Mixer screen before being taken back to the Arranger Screen.).
20 Timeline/Marker Display showing the Time Marker ( the green marker ![]() ) at the beginning of the project timeline.
) at the beginning of the project timeline. ![]() . The numbers on the top show the the duration in minutes and seconds. The numbers on the bottom show the duration in musical bars according to the Tempo Settings. Any Markers and Tempo changes you add to your project will be displayed here as well as the Loop markers when Loop Mode is active and Punch In and Punch Out markers when they are present. For more information on Punch In/Out see here. For more information on Tempo Changes, see here. Single tap on the Timeline/Marker Display to move the Time Marker to that point. Double tap on the Timeline/Marker Display to open the Marker Options.
. The numbers on the top show the the duration in minutes and seconds. The numbers on the bottom show the duration in musical bars according to the Tempo Settings. Any Markers and Tempo changes you add to your project will be displayed here as well as the Loop markers when Loop Mode is active and Punch In and Punch Out markers when they are present. For more information on Punch In/Out see here. For more information on Tempo Changes, see here. Single tap on the Timeline/Marker Display to move the Time Marker to that point. Double tap on the Timeline/Marker Display to open the Marker Options.
21 Current track Channel Strip ![]()
![]() . The Channel Strip gives you a range of controls over the currently selected track and allows you to access the FX (effects) Grid for audio and instrument tracks. These controls are shown across more than one Channel Strip page. For more details about the Channel Strip for audio tracks, see here. For more details about the Channel Strip for instrument tracks, see here.
. The Channel Strip gives you a range of controls over the currently selected track and allows you to access the FX (effects) Grid for audio and instrument tracks. These controls are shown across more than one Channel Strip page. For more details about the Channel Strip for audio tracks, see here. For more details about the Channel Strip for instrument tracks, see here.
22 Channel strip Page Selector ![]() . As mentioned above, the Channel Strip controls are shown across more than one page. Use the Page Selector buttons to navigate from one page to another. The smaller your device screen, the greater the number of pages will be needed to cover all of the Channel Strip controls and therefore the greater the number of pages shown in the selector.
. As mentioned above, the Channel Strip controls are shown across more than one page. Use the Page Selector buttons to navigate from one page to another. The smaller your device screen, the greater the number of pages will be needed to cover all of the Channel Strip controls and therefore the greater the number of pages shown in the selector.
23 An example of an Audio Clip on track one of the Time Line area. Resize the display of clips, or zoom in/out, by using two fingers to pinch or pull. Select an audio clip by tapping it. Once selected, you can trim a clip using the white handles which appear at either end. You can adjust the clip's volume using the volume envelope handles (the white squares) found at the top of the clip. You can move the clip by pressing, holding and sliding using the middle area of the clip and you can open the Clip/Track Options by clicking on the three-dot button. Long press on any area of a track not containing a clip to open the Track Options. (The time needed for the app to register a long press can be adjusted to your preference using the Pop-up Menu Time option in the User Interface section of the Settings).
When enabled in the Settings ![]() , double tapping an audio clip will allow you to open it in Vocal Tune Studio. When this option is deselected, an audio clip can be opened in Vocal Tune Studio via its Clip Options.
, double tapping an audio clip will allow you to open it in Vocal Tune Studio. When this option is deselected, an audio clip can be opened in Vocal Tune Studio via its Clip Options.
For more information on audio clips, see here.
24 An example of a MIDI Clip on track two of the Time Line area. Resize the display of clips, or zoom in/out, by using two fingers to pinch or pull. Select a MIDI clip by tapping it. Once selected, you can trim a clip using the white handles which appear at either end. You can adjust the clip's volume using the volume envelope handles (the white squares) found at the top of the clip. You can move the clip by pressing, holding and sliding using the middle area of the clip and you can open the Clip/Track Options by clicking on the three-dot button. Double tapping a MIDI clip on a MIDI instrument track opens the clip in the Piano Roll Editor. Double tapping a MIDI clip on a MIDI drum pattern track opens the clip in the Drum Pattern Editor. Long press on any area of a track not containing a clip to open the Track Options. (The time needed for the app to register a long press can be adjusted to your preference using the Pop-up Menu Time option in the User Interface section of the Settings). For more information on MIDI clips, see here.
25 Playback Transport Controls ![]() . These are the controls for starting and stopping playback and recording.
. These are the controls for starting and stopping playback and recording.
![]() Start Playback from the beginning of the project.
Start Playback from the beginning of the project.
![]() Playback from the position of the Time Marker (The green marker
Playback from the position of the Time Marker (The green marker ![]() in the Timeline/Marker Display). The play button will turn into a pause button when playing. Pressing pause will stop playback and (unlike Stop) un-pausing will continue playback at the position when pause was pressed.
in the Timeline/Marker Display). The play button will turn into a pause button when playing. Pressing pause will stop playback and (unlike Stop) un-pausing will continue playback at the position when pause was pressed.
![]() Stop Playback or Recording.
Stop Playback or Recording.
![]() Record.
Record.
26 Playback Timer Display ![]() . This display shows the current time during playback and in red during recording. When playback and recording are stopped it displays the current position of the Time Marker (the green marker
. This display shows the current time during playback and in red during recording. When playback and recording are stopped it displays the current position of the Time Marker (the green marker ![]() shown in the Timeline/Marker Display). Tapping the Playback Time Display once will open the Tempo options for the current project. The top counter shows the time in minutes, seconds and milliseconds. The bottom counter shows the time in bars (or measures), beats and ticks (the resolution is 192 ticks per beat) according to the project Tempo settings. This is also the place where most parameter levels are displayed as they are being changed.
shown in the Timeline/Marker Display). Tapping the Playback Time Display once will open the Tempo options for the current project. The top counter shows the time in minutes, seconds and milliseconds. The bottom counter shows the time in bars (or measures), beats and ticks (the resolution is 192 ticks per beat) according to the project Tempo settings. This is also the place where most parameter levels are displayed as they are being changed.
27 Project Overview / Scrollpad ![]() . The Project Overview/Scrollpad is a very useful feature which displays a miniature view of the entire project and allows you to quickly move within the timeline. Since there are only two tracks in the screenshot above, the Project Overview/Scrollpad perhaps doesn't illustrate this as well as possible. As such, here is the Project Overview/Scrollpad from the screenshot used in the Introduction
. The Project Overview/Scrollpad is a very useful feature which displays a miniature view of the entire project and allows you to quickly move within the timeline. Since there are only two tracks in the screenshot above, the Project Overview/Scrollpad perhaps doesn't illustrate this as well as possible. As such, here is the Project Overview/Scrollpad from the screenshot used in the Introduction ![]() . Here you can more easily see how all of the tracks, clips and the full duration of the project is being displayed. By touching and sliding within the Project Overview/Scrollpad, you can quickly select and move your main project viewpoint and simultaneously position the green Time Marker
. Here you can more easily see how all of the tracks, clips and the full duration of the project is being displayed. By touching and sliding within the Project Overview/Scrollpad, you can quickly select and move your main project viewpoint and simultaneously position the green Time Marker ![]() in the Timeline/Marker Display without your finger obscuring it as you do so. A yellow rectangle, shown within the Project Overview/Scrollpad, indicates what part of the project is currently being displayed on the screen.
in the Timeline/Marker Display without your finger obscuring it as you do so. A yellow rectangle, shown within the Project Overview/Scrollpad, indicates what part of the project is currently being displayed on the screen.
28 Add Track button ![]() . The Add Track button opens the following Options to allow you to add audio and MIDI tracks to your project. For more information, see here.
. The Add Track button opens the following Options to allow you to add audio and MIDI tracks to your project. For more information, see here.

NOTE. You can also use Automatic Track Creation for audio tracks . When enabled (in the Audio section of the Settings) this automatically creates a new audio track when record is pressed and no track is armed. Automatic Track Creation is enabled by default.
29 Timeline Area. This is where your audio and MIDI clips are displayed on their tracks. Two example clips are shown in the screenshot above. The first, in track one, is an audio clip. The second, in track two, is a MIDI clip. Use two fingers to pinch or pull to resize, and therefore zoom into and out of, clips.